Manual camera controls
Automatic cameras are great, but by setting the camera up manually you have far more creative freedom and can take more interesting photos. Here’s how, with NightCap Camera’s quick and easy manual controls.
Using manual
You don’t need to switch to manual mode. Simply touch the camera view and the manual controls will display automatically:
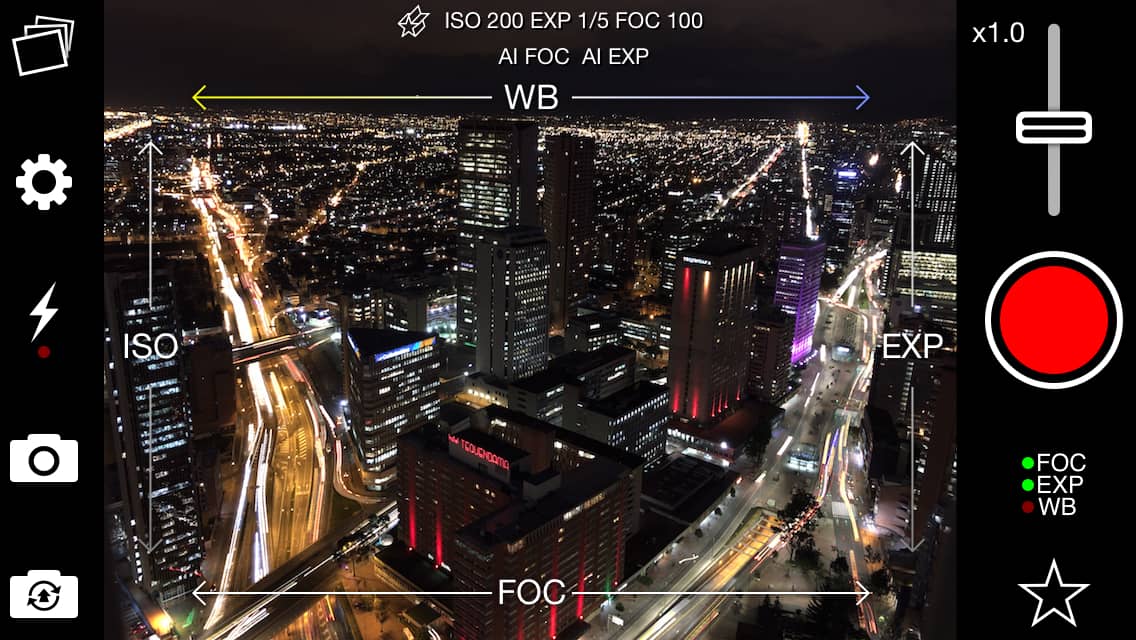
When you make a manual adjustment, it’s applied instantly and that setting will be locked. For example if you adjust focus, focus will now be locked in that position until you change it again or unlock it. Exposure and ISO are linked, so if you adjust either then both will be locked.
The locks indicator on the lower right shows which settings are currently locked – on the screenshot above FOCus and EXPosure (and ISO) are locked.
Going back to automatic mode
To return to automatic focus, exposure, or white balance you just unlock the settings (tap the FOC/EXP/WB button to open the locks panel then just tap to lock/unlock each setting).
What do the manual controls actually do?
There are 4 manual controls:
1. Focus
Focus simply moves the camera lens, adjusting the “focus point”. A camera focuses on objects at a certain distance, where objects at that distance are clear and “in focus”, and objects much closer or further away are blurry and “out of focus”.
Slide your finger across the bottom of the screen – left to focus on closer objects, and right for more distant objects. 100 will focus on ‘infinity’, perfect for landscapes or stars.
2. Exposure
Exposure time (sometimes called “shutter speed”) is the length of time the camera is exposed for. The longer it’s exposed to light, the more time there is for light to enter the camera, and the brighter the photo will be.

Exposure time on the iPhone is limited to a second or less, so exposure is normally displayed as a fraction of a second: 1/2s or 1/10s.
To set exposure, slide your finger up and down on the right hand side of the screen. It’s up for longer exposure (brighter) and down for shorter (darker).
3. ISO
ISO refers to how “sensitive” the camera is. As ISO goes up, the camera gets more and more sensitive to light, so the image gets brighter.
There’s a catch though: as the camera gets more sensitive, it picks up more noise and the photo gets more and more grainy. It’s always better to use low ISO and longer exposure if you can, but when that’s not possible turn up ISO to get a brighter picture.

iPhones and iPads typically allow up to 2000 – 3000 ISO, but NightCap has an “ISO Boost” feature (available in the in-app settings menu) that lets you go 2x (low setting) or 4x (high setting) higher. The photo will become very grainy at very high ISO, but if you use Long Exposure mode it will remove most of the image noise.
Slide your finger up and down on the left side of the screen to adjust – up goes higher / brighter.
4. White Balance
The colour of “ambient light” (typically the light from the sun or indoor lighting) varies a lot. Sunlight has a “warm” yellow tint, but if you’re in a shaded area the yellow sunlight is blocked and the light comes from the blue sky, giving you a “cool” blue light. Yellow sunlight tends to be associated with warmth (and by association, feelings of happiness) and blue shadows tend to associate with coldness and sadness.
Your eyes naturally adapt to these changes in light colour, and things only look blue or yellow when you suddenly go from one extreme to the other.
Cameras must adapt too, or your photos would all look unnaturally blue or yellow. The iPhone does this automatically, and manages it very well (especially on the latest models), but the automatic system can get confused by some types of lighting, and sometimes you can improve a photo by tweaking the white balance.
You can “brighten up” a picture on a cloudy day by making the colours “warmer”. You can do this by sliding your finger to the right in the top half of the screen.
If you want to “cool down” a photo simply slide to the left.
Practice, practice, practice
Learning what the manual controls do is an important step to improving your photography skills. This tutorial gives you an overview of what the controls do and where you might use them, but like any other skill the best way to get better is through experience.
Try to take every photo with some manual adjustments, and experiment with the various controls. You’ll soon get the feel of what they do, and you’ll soon find you know what to do to get a tricky shot just right!