Long Exposure / Light Trails Modes and Advanced Features
You can take some great photos with NightCap Camera without touching anything but the shutter button. But if you want to get the best from the app, it’s worth learning how to use the extras like Long Exposure mode and Light Trails mode – you can take amazing pictures with ease once you know how!
Long Exposure and Light Trail modes
These two special modes work by taking lots of photos very quickly, blending them together to produce a single photo at the end. This way they can take pictures that have virtually unlimited exposure time. They work best with a tripod.
To take a photo in Long Exposure or Light Trails mode, simply tap once to start, and again to finish the shot. With NightCap’s live preview you can see exactly how the shot will look.
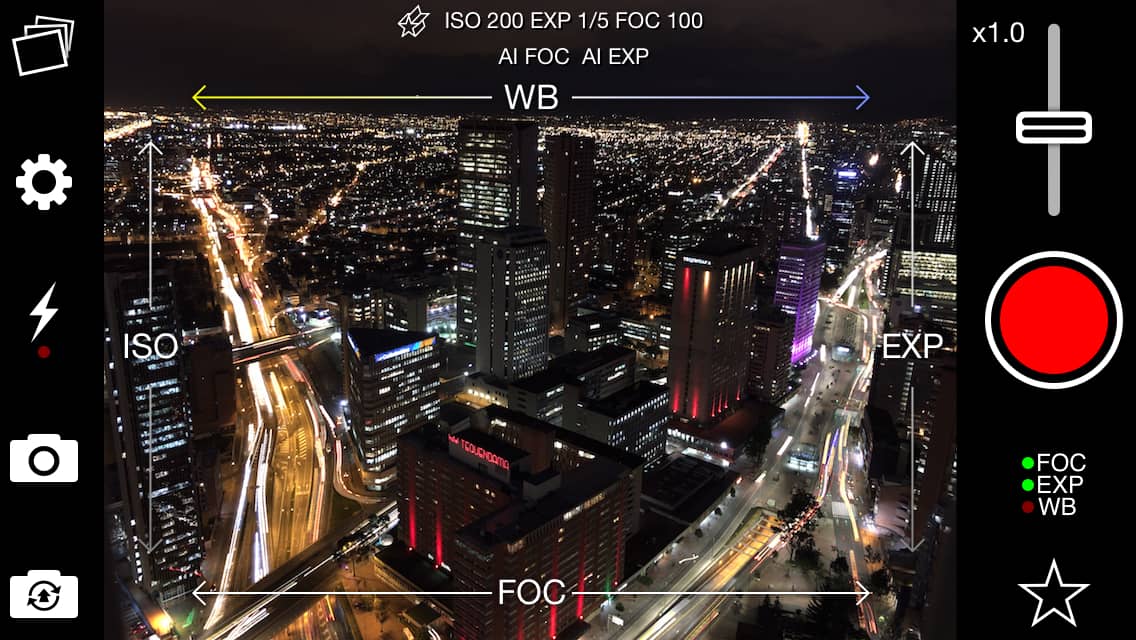
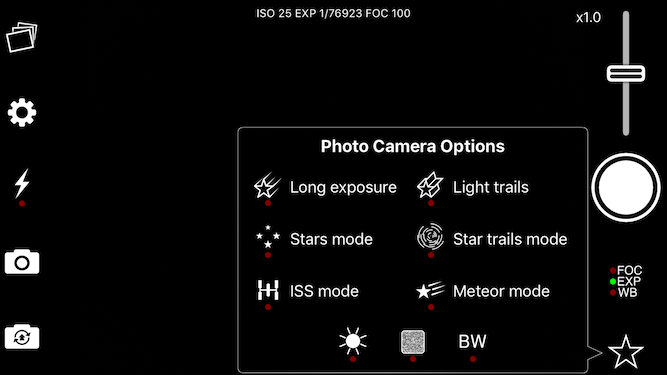
Tap the Star button to open the camera tools:
These photos show the difference between the modes.
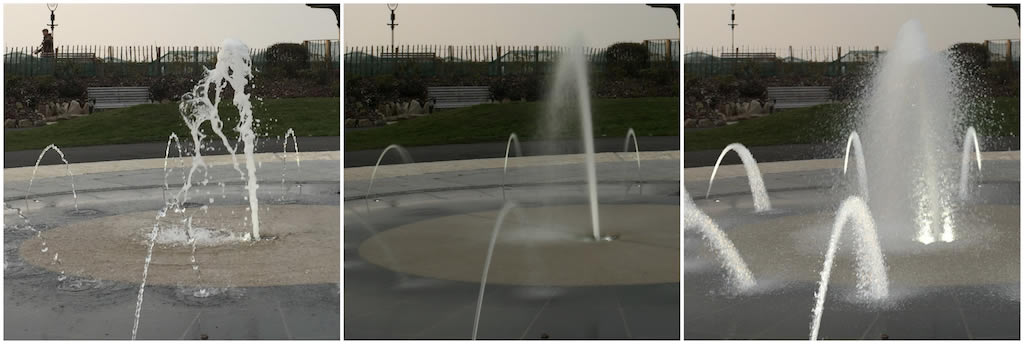
Long Exposure mode 
This mode is useful for “motion blur” and for taking very clear photos in low light.
Standard photo, water reflections are rippled by the waves
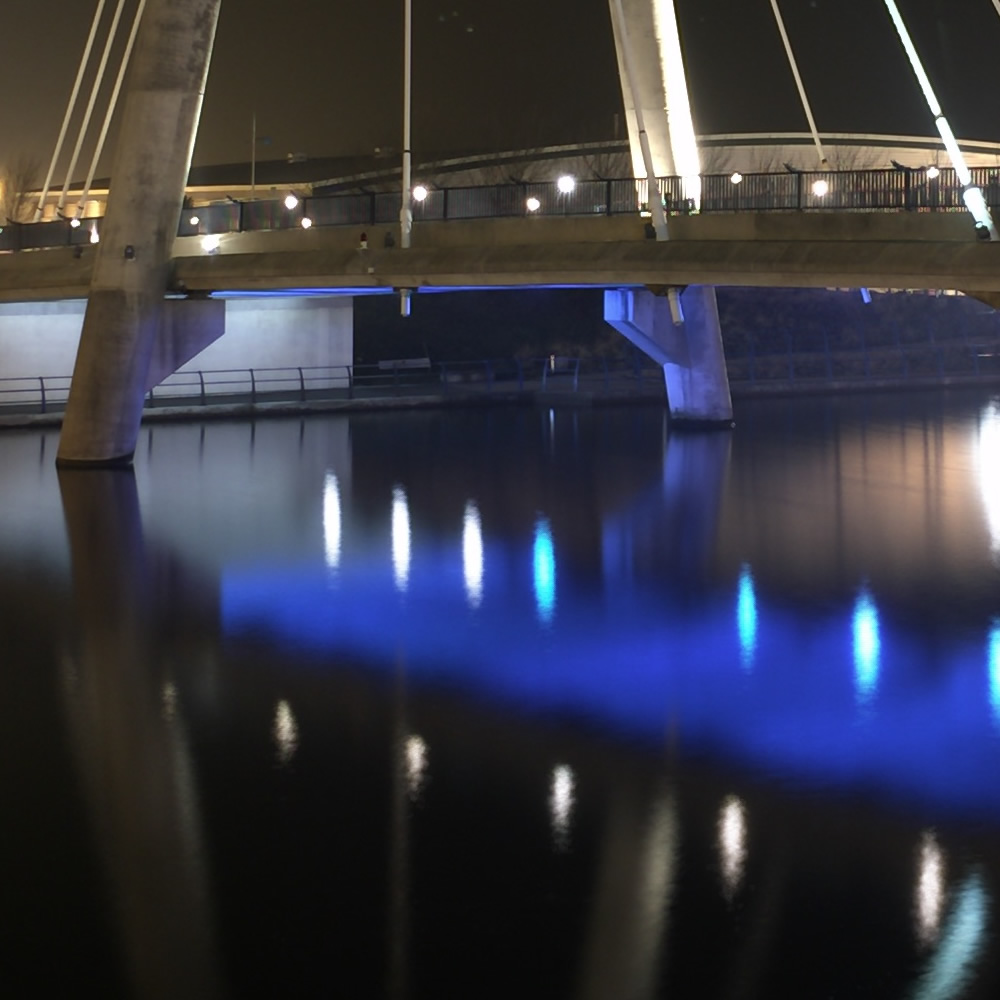
Long exposure mode smooths out ripples in water for glossy reflections
Standard low light photos can be grainy
Long exposure mode reduces graininess
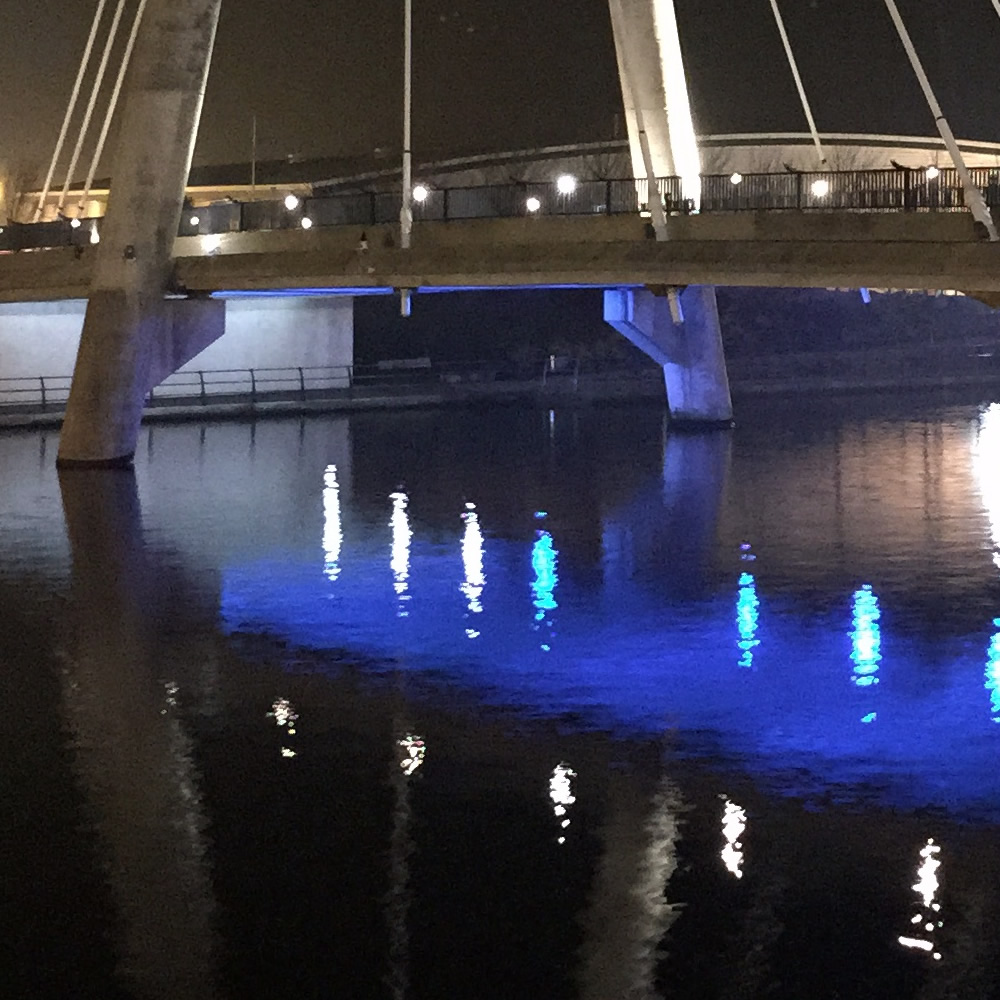
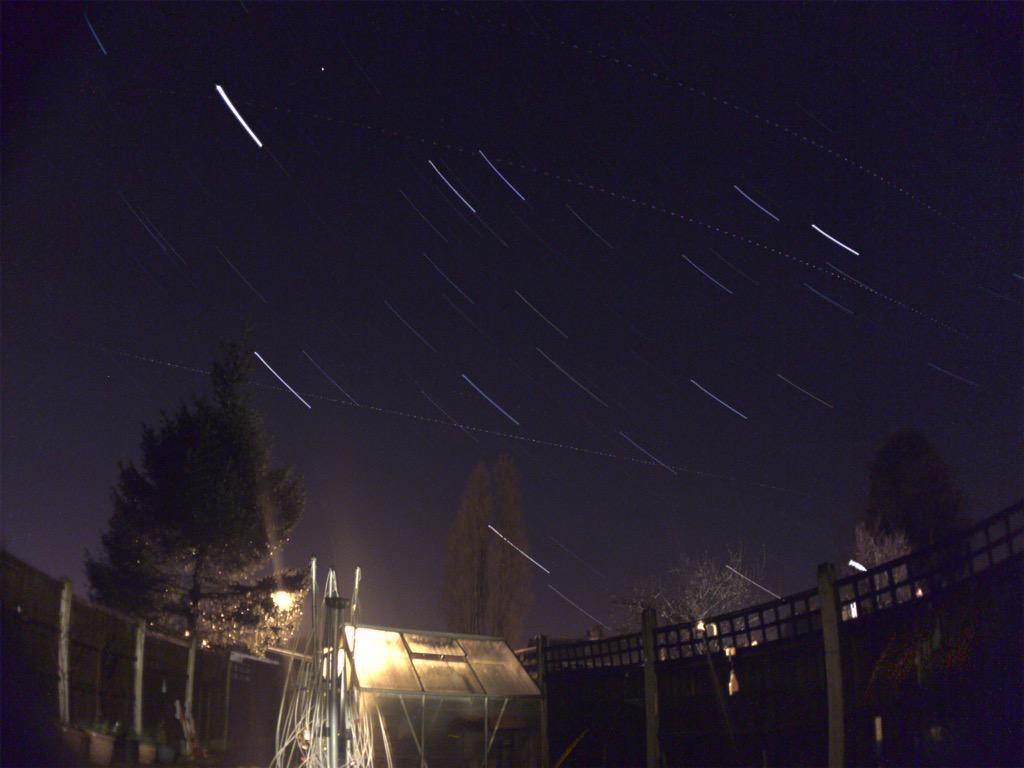
Light Trails mode 
This mode is designed to capture moving lights, so for example moving traffic at night will paint lines across the photo.
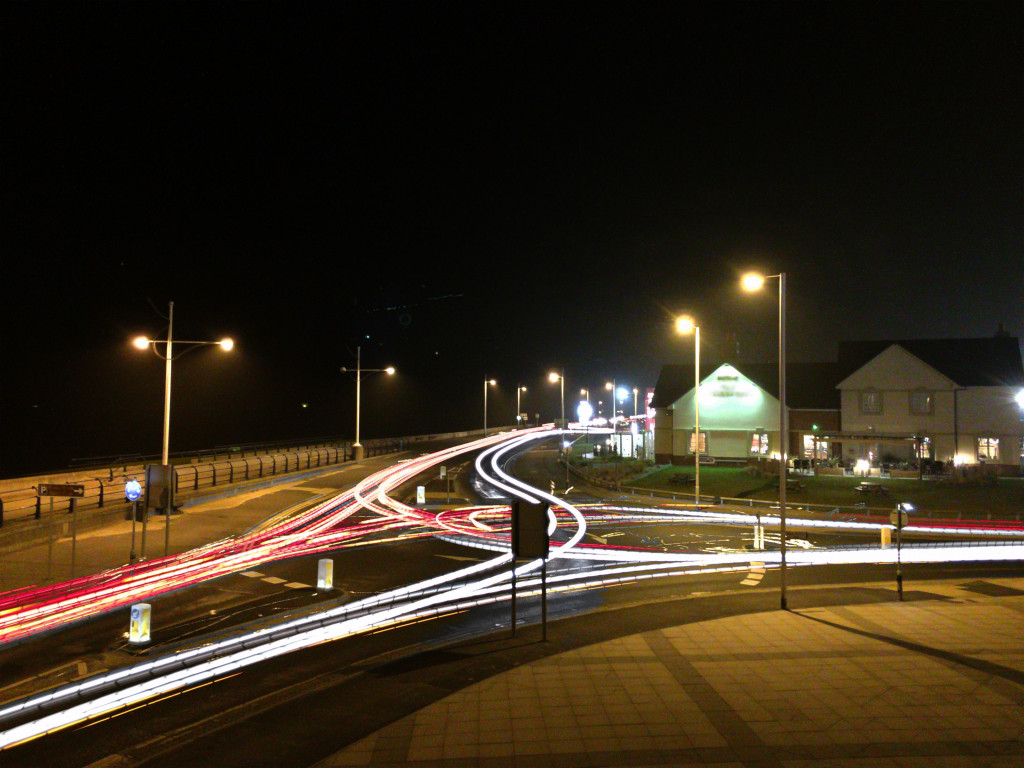
Light Trails mode is great for capturing any bright movement, including things like lightning an fireworks. At night you can use it to photograph star trails (leave it capturing the night sky for at least 10-15 minutes and you can see the stars painting circles in the sky):
Taken by Grainge (Twitter: @grainge)
See our Night Sky iPhone Photography tutorial for more amazing things you can do with Light Trails mode.
Exploring the Settings menu
Open the Settings menu by tapping the gear icon. You’ll find a mix of app settings and additional tools here.
The 3×3 grid
Turn this on to display a 3×3 grid over the camera view. This helps to compose your photos nicely – line up major objects or lines (such as the horizon) with one or more of the lines. This is a very common way to get better photo composition, and is known as the Rule of Thirds (you can read more about it here).
Geotagging
Geotagging simply means that your photos are “tagged” with the location they were taken in. Geotagged photos will be listed in the Photos app by the place they were taken in, and can be viewed on a map if you wish.
Remember that if you turn this feature on any photos you share with other people or on the internet will identify your location at the time the photo was taken.
If you turn on Geotagging, NightCap will request permission to access your location. This information will only be used for tagging photos. It will never be used for anything else - we will never have access to it, or pass it to anyone else.
HQ JPEG and TIFF
This setting changes the quality and the type of file NightCap saves when it takes a photo.
Normally standard JPEG will be fine. This is very good quality, and the photos won’t take up too much storage space on your iPhone or iPad. But if you need higher quality for some reason:
HQ JPEG saves JPEG files at the highest possible quality setting. JPEG is a “lossy” format which means it always loses some image quality when saving, but with this setting the loss is very slight. Files can be a lot bigger with this option (1.5-3x more than standard JPEG).
TIFF is a “lossless” format. This means perfect quality, with no loss at all. The downside is that photos take much longer to save, and take much more storage space (6-10x more than standard JPEG).
Self-Timer
The self-timer simply adds a delay between when you press the shutter and when the photo is taken. This is useful if you want to be in the photo – it gives you time to move into position after pressing the shutter.
Interval Programmer
This feature is very powerful, and very easy to use too. It simply lets you set the camera up to take a sequence of photos. You set the number of shots and the interval between them, and NightCap will take the photos automatically when you press the shutter button. The interval programmer can be used for a number of things:
-
Taking a timed long exposure photo, for example if you’re taking a photo of star trails you can set it to capture a single one-hour exposure in Light Trails mode
-
Taking a sequence of photos at a fixed interval
There are three settings, tap each one to show a slider underneath to adjust:
-
Number of photos to take. You can set it to take between 1 and 9 photos, or slide all the way to the right for “∞” (infinity, or unlimited photos – tap the shutter button to finish taking pictures).
-
Exposure time for Long Exposure / Light Trails mode. If you’re using Long Exposure or Light Trails mode, use this to set the duration of the exposure. You can set it between 1 second and 60 minutes. This setting is ignored in standard camera mode.
-
Interval between photos. This is the length of time to wait between shots. You can set it between 0 and 60 seconds.
The interval programmer works with the self-timer if you want to start it capturing after a delay.
ISO Boost
“ISO” simply means how “sensitive” the camera is to light. The more sensitive it is (higher ISO), the brighter the picture will be. There is a downside though: the more sensitive it is, the more “noise” the camera will pick up. This makes photos at very high ISO very grainy.
iPhones and iPads have a limited ISO range, typically up to 2000 on recent devices. NightCap’s ISO Boost feature lets you extend this. Low allows up to 2x higher (ISO 4000), and High allows up to 4x higher (ISO 8000).
The High setting can result in very grainy images, but if you use Long Exposure mode with it you can take very good quality photos even in extremely poor light.
Volume Shutter
The last setting lets you use the volume buttons (including the remote control on headphones) or a bluetooth shutter control to take a photo instead of tapping on the screen. Simply turn it on to use the volume buttons.
Not got NightCap Camera yet?